EV Charger Installation Guide
- Check network: If WiFi is weak at the charger location, consider running a CAT5/6 cable to the site
for LAN or installing a WiFi repeater to aid with signal strength.
A WiFi connection or LAN is mandatory for app setup. In the scenario where home WiFi is weak or
missing at the charger’s location, use a phone hotspot or wireless repeater to perform the first setup.
After the first setup, the charger will use LAN and the hotspot/repeater can be removed. If using LAN
to set up, a WiFi password is not required during the setup process and can be left blank during this
step.
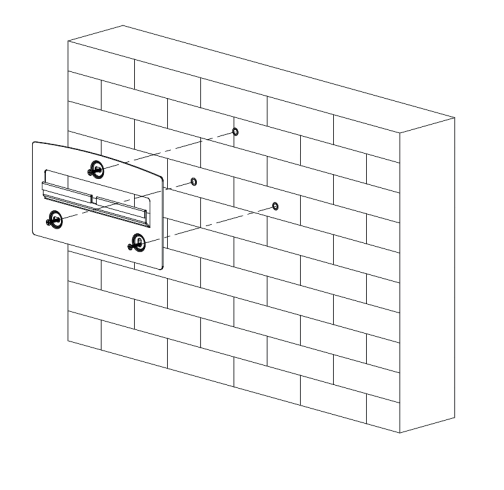
- Mount bracket: Place the wall mounting bracket horizontally onto the wall and mark the position of
the bracket holes. Drill 3 holes at the marked positions, at least 75mm deep. Fix the mounting bracket
to the wall using the fixings provided.
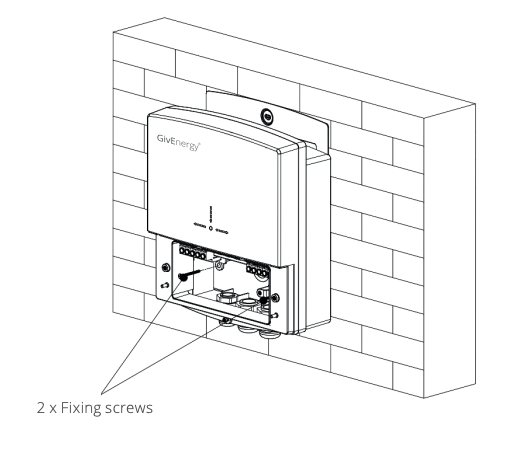
- Mount charger: Remove the decorative cover and the sealing cover from the charger, retaining all
screws. Mount the charger onto the mounting bracket. Drill 2 holes at the marked positions, at least
75mm deep. Secure the charger to the wall using wall screws.
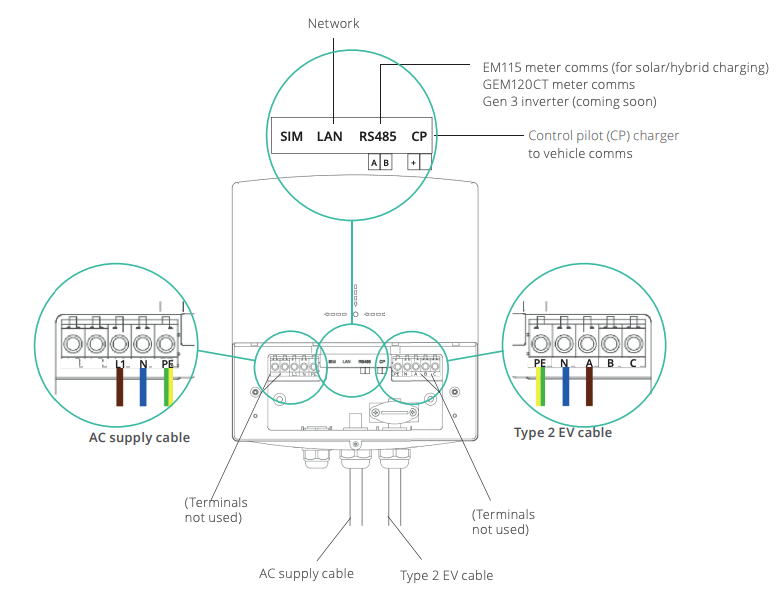
- Wire charger: Pass the power cable through the rubber grommet. Remove the 12mm insulation
layer on the wire. Insert the wire into the corresponding terminal. Tighten the screws to ensure
there is a stable connection. Attach any RS485 and/or LAN cable as required for the installation
configuration selected (see Installation Configuration section).
- Wiring diagram:
- Run cables from charger to home:
- Power cable (32A) to the charger from grid feed
- LAN cable from charger to home router if required (see step 1)
- Any additional cables required by the selected installation configuration (see Installation
Configuration section)
- Cables should be specified according to their usage and connected. Please note: it is recommended
to install an appropriately specified RCD/RCBO on the input side of the power cable.
- Test charger: Turn on the supply to the charger (RCD/RCBO) The EV charger should power up and beep once or twice as below: 1 beep means the charger cannot detect a grid meter 2 beeps means the charger can detect a grid meter
- Finalise installation: Fix the sealing cover to the charger with the previously removed screws.
Attach the outer cover to the charger, ensuring that it locks into place. Secure outer cover with the
previously removed security torx screw. Whilst securing the sealing cover, please ensure that the
tamper switch is securely pressed down into position. The tamper proof switch is included to comply
with the smart charging regulations and must be engaged. If the tamper switch disengages, the
charger will stop charging and the user will be notified of a tamper event.
- User handover:
- Prompt the customer to finalise setup in the GivEnergy app. The homeowner should be
present at the end of installation so that:
- They can log in to their GivEnergy account on their mobile
device (in order to associate the charger with their account).
- They can enter their home WiFi password during setup.
- The installer can walk them through the app setup and advise
/ assist if technical parameters require adjustment.
- Confirm that the customer can access the new charger in the GivEnergy app. Provide a walkthrough on the app to inform the customer of the charger features that will
be available to them (see Installation Configuration section).
Related Articles
Connection Guide
Connections Overview Label Item A LoRa connection Module (spare) B PV meter (ID2) C Grid meter (ID1) D Load (house supply) E AC supply (in) F All in One supply G PV inverter supply H EV charger (spare) I All in One parallel connection J Grid bypass ...
Giv-Gateway Connection Guide
All in One Installation with Giv-Gateway Extra care and attention must be taken when installing and maintaining any GivEnergy equipment. The system is capable of retaining a high voltage, even when disconnected. All electrical installations must be ...
Manually Connecting Your EV Charger to the GivEnergy Cloud
This guide explains how to manually connect your GivEnergy EV Charger (EVC) to the GivEnergy Cloud if it does not come online automatically. These steps are typically used during troubleshooting or initial setup where WiFi details need to be entered ...
EV Charger Troubleshooting
Beep codes When powering up the EV charger for the fi rst time, the charger will beep a number of times before switching to normal operation. 1 beep means no meter / comms detected - If you have a meter connected please check the communication cable ...
EV Charger Operation
Charging Ensure the vehicle is turned off and that the EV charger is switched on. Plug the charging cable into the charging socket on the electric vehicle. Charging can be started by swiping the RFID card across the RFID reader on the charger unit, ...